Homepage
Homework & Revision
> Information Technology
Technology
Hiking
More about the H/G
Teachers
More about Mr Hughes
Open Door Website
Mr Damon's Website
Contact
|
Welcome
to IT I IT Certificate 1 l
IT Certificate 2 1.
Background, Title & Filename |
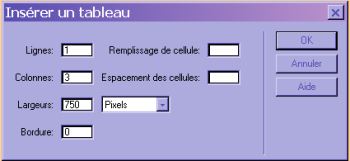
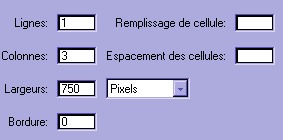
Tables and ColumnsText should be placed in columns on a web page, just as it is in a newspaper or magazine. This makes it much easier to read. On average there should be about twelve words to a line . Inserting a TableWe insert a table to make columns. To do this go to Insertion > Tableau > Insérer un tableau. This window opens up :
Change to the following figures (notice that we've asked for the table to be measured in Pixels rather than as % de fenetre) :
Click OK and you should get this :
Centring the TablePlace the cursor inside the left-hand cell of the table, click the right-hand mouse button and then Tableau > Selectionner tableau:
The table now has a black border to show it has been selected:
The properties window gives us information about the table:
In the top right of the properties window change the alignement from Par defaut to centré:
. At this stage you may like to make your table a slightly different colour to the page background. If so , click on Ar-pl to open the colour palette:
You can always come back later to change the table colour, anyway. Fixing the cell widthsClick any empty part of the page to de-select the table. Place the cursor in the left hand column (or cell ) of the table and the properties window gives us information about that cell:
For the left-hand cell type these figures
The cell width will be 200 pixels and the vertical alignement (Vert) will be haut. Now move to the centre cell and type in these figures:
and in the right-hand cell these figures:
The result should be a centred table with a column on the left for a logo and list of links, a narrow column next to it which serves as empty padding and a right hand column for text and pictures. By placing your cursor in ant column and pressing the Enter key you can deepen the table as follows:
Now we're ready to add a 'logo' and a 'links to the main pages' column .
|