Homepage
Homework & Revision
> Information Technology
Technology
Hiking
More about the H/G
Teachers
More about Mr Hughes
Open Door Website
Mr Damon's Website
Contact
|
Welcome
to IT I IT Certificate 1 l
IT Certificate 2 |
|
Making a Powerpoint Presentation
1. Open the Power Point from the desktop or from Start > Programmes > Microsoft Office. The introductory page
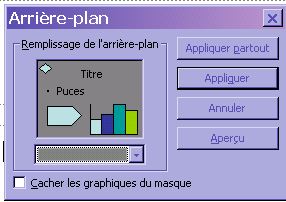
2. Go to Fichier > Enregistrer sous and record your presentation with the name you have chosen in the folder you have chosen. 3. Go to Format > Arrière-plan and scroll down the the colour palette to choose a background colour. When chosen click 'Appliquer partout'.
4. Click once on the 'Cliquer pour ajouter ...' text box. Little white circles appear in the corners of the text box. This means it's selected. If you move the cursor to one of the white circles of the text box a double arrow appears . This means you can stretch the box bigger or smaller. If you move the cursor to the grey edge of the text box a quadruple arrow appears : this means you can move the text box around the page.
5. Triple click the text 'Cliquer pour ajouter ...' . The text is now selected and you can type the title of your presentation. 6. Go to Format > Police and you can choose the type of writing, the size and the colour. If your background is light coloured then your writing should be dark and vice versa. 7. Move your title to the top of the page, click once on the other text box 'cliquer pour ajouter...' and press the suppr key on keyboard to get rid of it.
8. Don't forget to record regularly - press Ctrl S. 9. Now add a picture to you title page . Go to Insertion > Image > A partir du fichier... and search for the picture of you choice from the folder where it's kept.
9. Go to Diaporama > Transition and in the choice in that opens in the right-hand toolbar select a transition effect. Don't choose anything too fancy - in the end it will just annoy the audience. 'Poussée vers la droite' is a good choice. 11. Click 'Diaporama' at the bottom to see the transition effect. Press Echap on your key board to come back to your worktop. 8. Don't forget to record regularly - press Ctrl S. The other pages 9. Go to Insertion > Dupliquer la diapositive and create a copy of the first page. 10. Click Affichage > Trieuse de diapositives and a sidebar opens to reveal your two pages. As you make more and more pages, you can click on any one of them in this side window and move their order in the slide show up and down. You can also delete any pages you might decide not to keep. If you have Affichage > Normal clicked then you can see all the presentation on the left of the window and work on the selected page on the right of the window.
11. On page two select the text (triple click) and in Format > Police reduce it to about size 20. Select the text box (one click)and reduce its size by sliding a double arrow inwards on one of the white corner circles. Now touch the grey edge of the text box and with the quadruple arrow move it to the top left of the page. 12. Reduce and move the picture in the same way to get this effect which will appear as a kind of logo on this and all the subsequent pages:
13. Don't forget to record regularly - press Ctrl S.
|